Some of My Go-To Remedies for Beleaguered Joints
“arthron” = joint
“itis” = inflammation
I’ve got it. If you’re reading this, you probably do, too.
I’m referring to osteoarthritis. Maybe you’re starting to feel stiff after exercising or simply after standing up from a chair. Maybe opening a jar lid isn’t as easy as it used to be. Maybe your knees are beginning to hurt for the first several minutes of a jog or walk, and then again after you cool down. All of these are signs of osteoarthritis. As scientists increase their understanding of it, osteoarthritis is no longer considered simply what happens when the shock absorber, cartilage, between bones breaks down from wear-and-tear and pain and stiffness result. The issue is more complex, with both immune and nervous systems contributing to whole-joint impacts. Beyond cartilage, other tissues in the joint may also become “angry,” such as tendons and ligaments. Nevertheless, osteoarthritis is, indeed, associated with wear-and-tear from repetitive joint use and from overuse. But other factors can also contribute. These include injuries, genetics that impact immune function and/or musculoskeletal structure, dietary habits, level and type of physical activity (hint – being sedentary is not helpful), and other contributors.
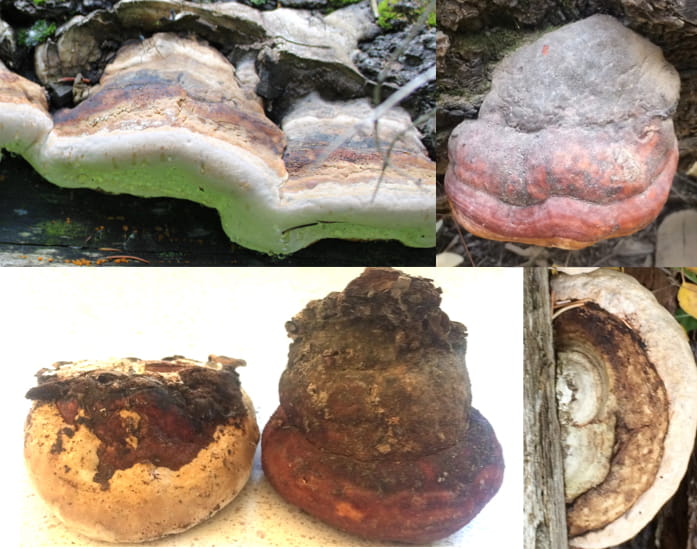
Red Belted Conk Montage, photos by Marija Helt
The word “osteoarthritis” originated in the 19th century. You may have heard of “rheumatism,” an older term from the 1700s that referred to a collection of musculoskeletal-related pain. Osteoarthritis, while increasing in prevalence, has been around for a very long time. Skeletal evidence demonstrates ancient peoples from around the globe had it. This includes Neanderthals who lived tens of thousands of years ago. And there’s a reptile fossil from the Mesozoic Era (66 million to 252 million years ago) showing evidence of that arthritis predates human beings. This is maybe not surprising, given that animals with skeletons and spines have been around for hundreds of millions of years.
While osteoarthritis isn’t (yet) curable, there are promising clinical trials using various types of human cells, serum, and other substances directly injected into the joint. Though while many of the trials demonstrate some pain reduction and improved joint mobility, only a small handful show any level of cartilage regeneration. These studies aren’t the focus of this blog or the class this fall. But, if you visit pubmed.gov and type “injection osteoarthritis” in the search bar, more references than you’ll want to deal with will come up. To narrow it down, look on the left side of the page and click on “5 years” under publication date, which will return articles from the past 5 years. Then, below that, click on “clinical trials” under article type. This will still bring up an overwhelming number of articles to go through, but if you simply scan through the first couple of pages of them, you’ll see some of what I’m talking about. Yes, they’re technical. But if you look at the article abstract, it’s summary, and see something interesting, you can print it out and bring it up with your doctor to get more information as to whether it’s a technique currently available outside of trials, what the safety issues and side effects are, whether it’s something covered by insurance, and such.
As an herbalist, the tools I use for supporting joint health include nutrition, appropriate movement, plants, and fungi. I’ll be going into greater detail on different plants, fungi, and other support in the “Supporting Joints, Naturally” live online class on November 14th. But for now, I’ll start with clarifying that such an approach can be quite helpful, but it’s not going to render folks with destroyed knees able to start running or to stomp down a mountainside carrying a heavy pack. That said, a natural approach can help ease discomfort, improve mobility, support joint tissues, and even allow dose reduction for NSAIDS to, in turn, reduce their deleterious side effects when used chronically.
On the herb and fungal side of things, I take an “outside-and-inside” approach, using both topical and oral preparations. But for preparations you take orally, you’ll want to let your herbalist know if you’re on any medications (not just arthritis meds). If you plan to experiment with herbs or mushrooms on your own and are currently on prescription meds, talk to your pharmacist before starting anything. This is especially important for those with a different kind of arthritis, rheumatoid arthritis — some of the drugs prescribed have a small difference in dosage between helpful and dangerous, so tossing other things into the mix without additional information isn’t a great idea. For example, certain classes of herbs and mushrooms taken orally are contraindicated.
Join Marija for Supporting Joints, Naturally Live Online: November 14, 2026

Red Belted Conk Sludge, photo by Marija Helt
OK, back to the outside-plus-inside approach, with an example. A favorite dynamic duo to support my achy, overworked, and previously injured thumb joints has been a topical application of red-belted conk-infused oil and an extract of nettle leaves and rose hips. On the latter, I typically make individual herb extracts and then combine into formulas so I can also use them separately when needed. They extract well in vodka, brandy, or other 80-proof spirit. This proof translates to 40% alcohol (ethanol) and 60% water. Making an extract is simple to do, but if you don’t already know how to make a “folk” tincture, I’ll get into it in the November class. Or you can simply pick the extracts up from a reputable purveyor and take them as per their instructions. A bit of nitty gritty detail… Extracting nettle leaves in vodka or other spirit doesn’t do a great job at capturing their great minerals that are beneficial for our joints, though it does capture compounds helpful for discomfort. The tea both nourishes and helps with discomfort, but one of its minerals, silica, can be present in high enough amounts to irritate the kidneys with long-term, uninterrupted use of the tea. (More on this in the class.)
On the “outside” side of the equation, here are instructions for making red-belted conk oil, with notes on where I find the conk. (More and more, it’s becoming commercially available from wildcrafters, especially some in the Pacific Northwest.)
Red-belted conk is a shelf fungus, meaning simply that the “mushroom” is rather hard and sticks out from wood like a shelf. In my neck of the woods (Southern Rockies), Fomitopsis shrenkii is the species of red-belted conk. Elsewhere in the country, there are other similarly used red-belted conk species such as F. mounceae and F. ochracea. The conks are ubiquitous in coniferous forests of the northern hemisphere and typically grow on dead wood. There are some reports of it growing in living trees, but I’ve yet to encounter a conk growing from a live tree here. Not to say that it doesn’t happen…
Red-belted conks can vary in appearance but become easy to identify once you get to know them. Other than newly emerging conks, which are creamy to pinkish in color and blob-shaped, the conks become crescent to hoof-shaped. The upper surface ranges from brownish to brown-gray and often (but not always) has a band of orangish to reddish coloration near the edge of the conk. In young conks, the edge will often be a light creamy color. This is new growth. The bottom surface is also cream-colored and has many tiny pores. Unlike that of artist’s conk (Ganoderma applanatum), this “polypore” surface won’t change to a brown color when you scratch it. Artist’s conk is also common in the woods, but here in the Rockies it’s most often on aspens rather than conifers. It does have some overlapping uses with red-belted conk, but I’ve not tried it as a topical preparation outside of perfumery.
Fresh red-belted conk has a tangy, sharp, woodsy scent, so don’t forget to use your nose in conk identification. The fresh conk will also be both tough and rubbery. If it feels dry or brittle, the conk is either too old or has degraded for some other reason. In terms of the size of conks to harvest, I stick with those around 4 inches across or smaller. The conks are perennial and can be several years to a decade or more old. I feel like the younger, smaller ones are better medicine because they’ve not started accumulating dead fungal tissue. Also, it seems a bit disrespectful to collect a huge conk after all the energy that has gone into its growth over the years.
After brushing off any debris, I chop the fresh conk carefully with a hatchet or with garden clippers into chunks of about 1/2 inch by 1/2 inch. I add a cup or so of olive oil or olive/coconut oil to my much-harassed blender, start it blending on medium/high to high, then add a handful of the conk cubes (put the lid on quickly). Note that conks can destroy your blender! Continue blending for 4 to 5 minutes to help break up fungal cell walls and start the extraction. (The oil will start warming up.) If it seems way too thick and your blender is straining, add more oil. You will have slimy, oily, somewhat chunky sludge when done. Transfer this to a double boiler. In my kitchen, this means a stainless steel bowl floating in a pot of water on the stove. Heat the mess on low for around 30 minutes, stirring occasionally and not letting the water temperature in the pot go above 110°F. (I don’t want to heat it too long because I don’t want to lose the mushroom aromatics.)
Then the sludge goes into a clean jar (the smallest possible for fitting it all). Cover the jar with a paper towel held on with a rubber band or, if using a canning jar, fasten it down with the lid ring. Let it sit overnight to infuse some more. The brave can even do two days of this step, but don’t let it go too long or it will start to mold due to the water content. Pour the sludge into a metal strainer set over a heavy bowl, pot, or pyrex container with a single layer of muslin, a piece of old cotton sheet/pillowcase (washed and boiled) or some other natural cloth. Using your just-washed hands, roll up the sludge in the cloth and squeeze the heck out of it to get as much liquid out as you can. Transfer the liquid into another clean jar and let it sit overnight, covered. The next day, carefully pour off the infused oil, not letting the thin layer of water and debris at the bottom of the jar come with it. (Or use a clean turkey baster or pipet to transfer the oil.)
Et violà — your red-belted conk-infused oil is ready for rubbing liberally on whatever hurts. The “what hurts list” where I’ve found it helpful, so far, includes my hands, my neck, my shoulders, and my low back. It also makes a nice muscle rub.
Good luck and happy mess-making in your kitchen!
Dr. Anna Marija Helt is an herbalist based in Durango, Colorado. She offers in person and online herbal consultations for health. She can be contacted at Osadha Natural Health for inquiries.
This article is for educational purposes only and is not meant to diagnose or treat a disease, or to supplant the advice of a licensed health care provider.